Well.. Its been a while. My bad, but honestly I have been busy. Busy with kids, an old house to fix up, injured horses, work and now thee worst sinus infection known to man. I swear!! But it also give me some time to update my blog for my 2 followers since my husband won't let me leave the house.. So prepare yourself for a catch-up session.
Swiss Day 2016
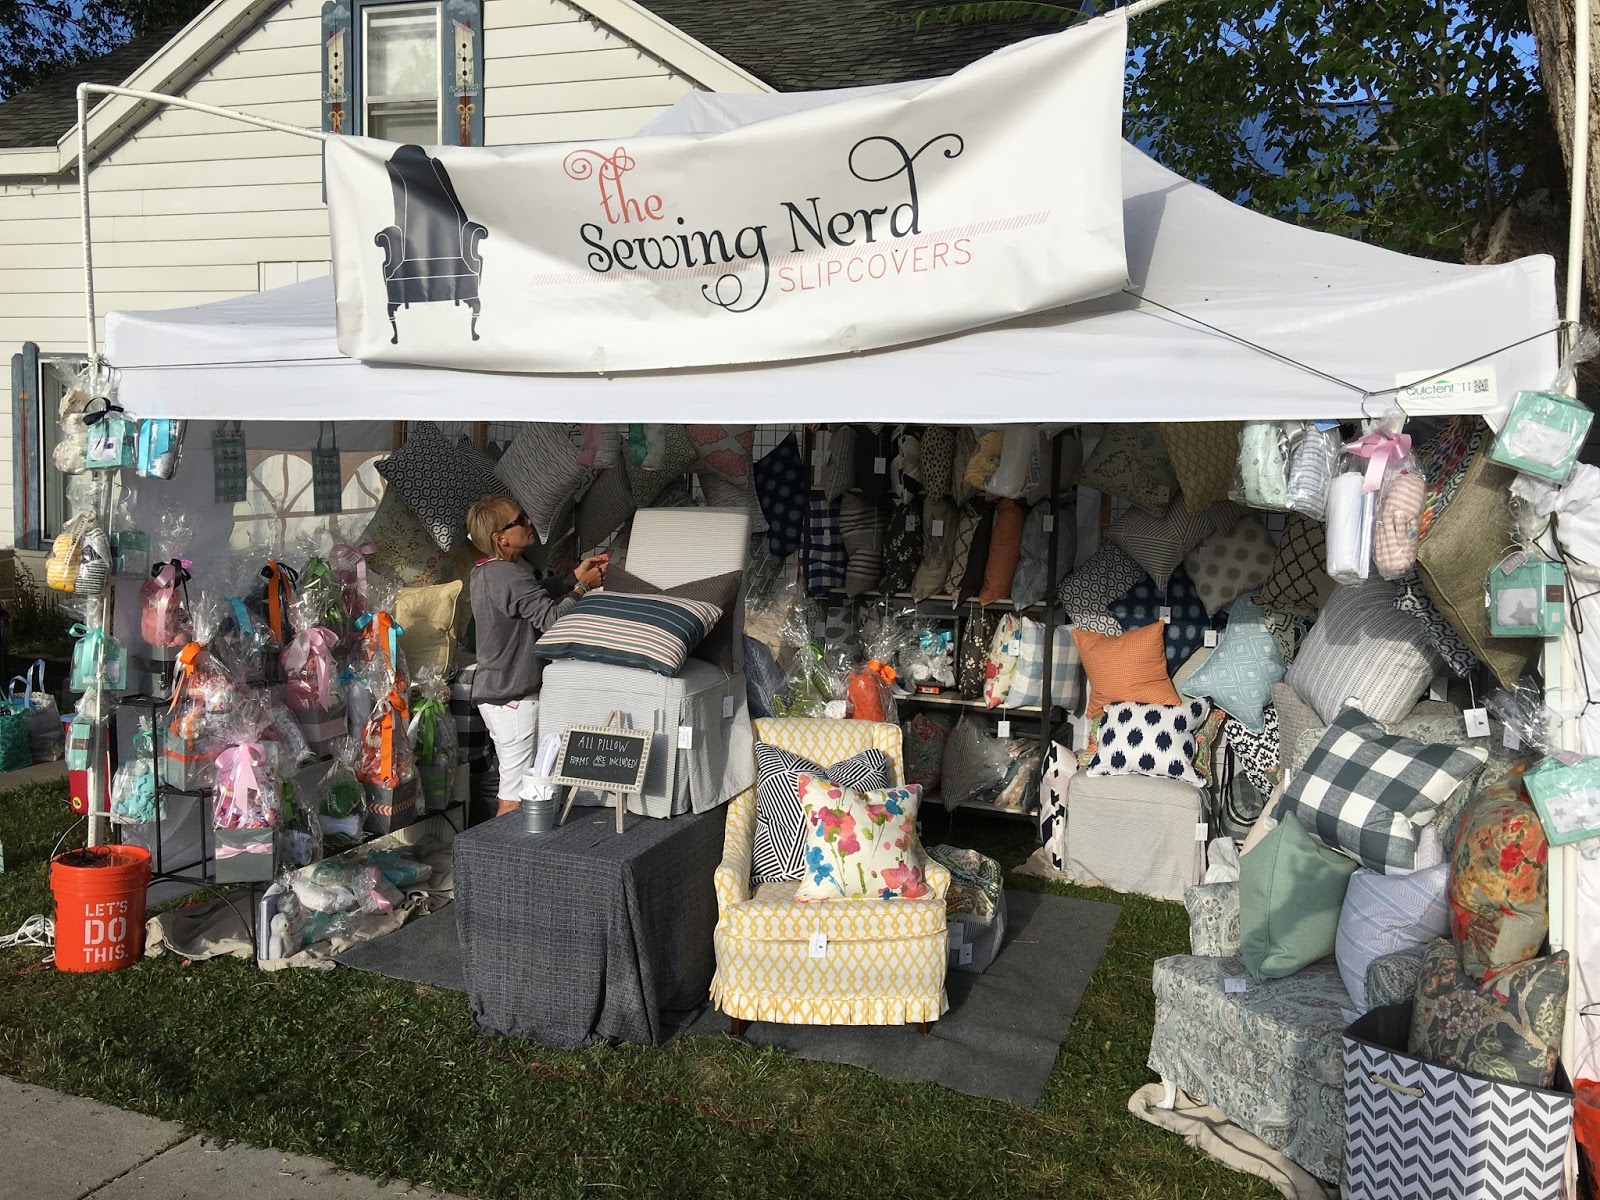
Swiss Days was so fun this year, I may have made so many pillows this time that we needed a few "kidnapper" vans to transport them...like 350ish pillows. Yikes! Turns out, people LOVED the "hey, do you want to see what I have back in the van?" approach! seriously, tho. At the start of Swiss Days my booth and van were packed to the brim and by the end of day one the van was 1/4 full. I loved seeing my repeat customers as well as making some new friends! I loved hearing, "We came just for you!" It made my day over and over agin, so much that I decided that I have another year in me... I sold thru all of the furniture I brought up as well as 85% of the pillows. It was a glorious weekend and I could not have done it without the help of my Mom, my BFF Carrie and Austin (The muscle). We definitely have it down to a science!
Soon after Swiss Days I had to get back in the swing of things, cause remember.. we moved. again! But this time it is the last! Although it will take some time to get the house how we want it, we are loving every second of it! So, for the time being, my workshop is now in the garage, which was fine for the summer and fall but now that winter has shown its ugly face, its a wee bit chilly out there.. It will be fine, I can hang in till we get our garage and shop built. Right?! I have been working and here is the proof!
This darling client of mine brought me 2 wing chairs and an oversized chair and ottoman to be covered. She wanted a looser fit on everything, which is just fine, but it took everything in me not to let my OCD take over and fit those suckers tight! She chose a nice washed white denim for the chairs with a cute box pleated skirt and a fantastic navy ticking stripe for the chair and ottoman. She wanted a farmhouse look and i think we nailed it! Here are the chairs before
and the chairs after!!
Oversized chair before:
Oversized chair and ottoman after:
She was soo happy with how they turned out and she loved how they were just loose enough.
I also made a cushion for a day bed swing for a friend of mine. She had a swing made for her back porch and decided to go navy on the cushion. Lucky for here I had a few pillows left over from Swiss Days because they went with her fabric like they were made for it!! She ended up getting them all!
That Nate Berkus knows how to design a print! I also ordered her some custom bolsters to go at each end of the swing and made the covers out of the cushion fabric. I don't know about you but Id love to spend some summer nights on this bad boy!
I had a repeat client bring me this number as well
She did a white denim with a gathered skirt. She has had me do a couch and a chair a few years ago and she keeps coming back for more! It turned out darling and will fit just right in with her other pieces!
Next up is this chair, it had been sitting in the corner of my clients bedroom and she was ready for a change. Like always, it was a great chair, it just needed and update..
You can't tell from the lighting but it the chairs original fabric was mauve.. it was time to say bye bye so she updated it with a soft yellow upholstery fabric that had grey bees embroidered on it. I had exactly enough fabric to to cover it and line the bees up. She loved it! Bees and all!


I also made a set of banquet cushions for another client of mine. She built one of my all time favorite Parade Homes with Millhaven back in 2013. Her house really launched the Farmhouse movement in Utah and she nailed it!! Well, when they had someone show up to their door and offer to buy it, they sold it! So she back at it with another build and boy oh boy, is it amazing!!! This time around her house is less farmhouse and more modern and I love it! It made me feel even better seeing some of her finishes in the new house because they were similar to the what we want to do with out house.. So i felt pretty legit! Lol! So ya, this picture may be pretty lame because one, its not in her house but look at what she chose for her fabric.. Its a basket weave leather-look vinyl. Its amzeballs!
If only I had snapped a picture of the inside of the house.. your jaws would be on the floor!
This next client was also in the middle of a new build when she dropped her pair of chairs off tome for some love. these chairs had awesome lines but again with the mauve... it had to go!
This pair is going in her new master bedroom and she wanted a yellow fabric withs some texture for the slipcovers. We keep the lines the same and but just a new color can do soo much!
I love when my clients are floored when they pick up their furniture. She was thrilled with the results and loved how "upholstered" they looked! I always wonder what my clients expect their slipcovers to look like when they pick them up, just because they are soo happy with how they turn out after! A lot of times they think I upholstered them.. lol!
This next client had a recliner in her bedroom she wanted me to slipcover. I am not gonna lie.. I HATE recliners and when ever I get texts or calls that start... "I have a recliner..." I almost always say no, but this client was determined and had faith that I could make it amazing. Bless her heart! When I go the picture of her chair it wasn't not bad at all. It didn't look like your typical recliner so I gave in, but she still wanted it to be functional... so ya... I love a good challenge and i pretty much nailed this one!
I ended up slipcovering it in 4 pieces... Each arm is separate from the main body and then the body of the chair is one piece as well as the foot rest. I had to take the dang thing apart, but if i didn't do that, every time you recline the chair you'd have to tuck the cushion in and that was not ok with me. Remember... OCD. She loved it and again, did not expect it to look anything like this! She was fully expecting to have to tuck and play with the fabric.
I had another cute client contact me about having a bench cushion made for a built in and she wanted it to be thick and full. She found some awesome white and blue weaved linen online.. that happened to ship from China, but it did not disappoint! I seriously want to slipcover a couch for me with it! IT washed up soo well and it was soo soft! This was her inspiration picture she sent me.. I knew I was gonna really like her!
Here is what hers looked like. I ordered her cushion with a down envelope, because thats how I roll! The cushion ended up being 7" thick and almost 7' long. I mean, I would love to curl up on that bad boy for a nice sunday nap!
Seriously tho... How great is that?!!
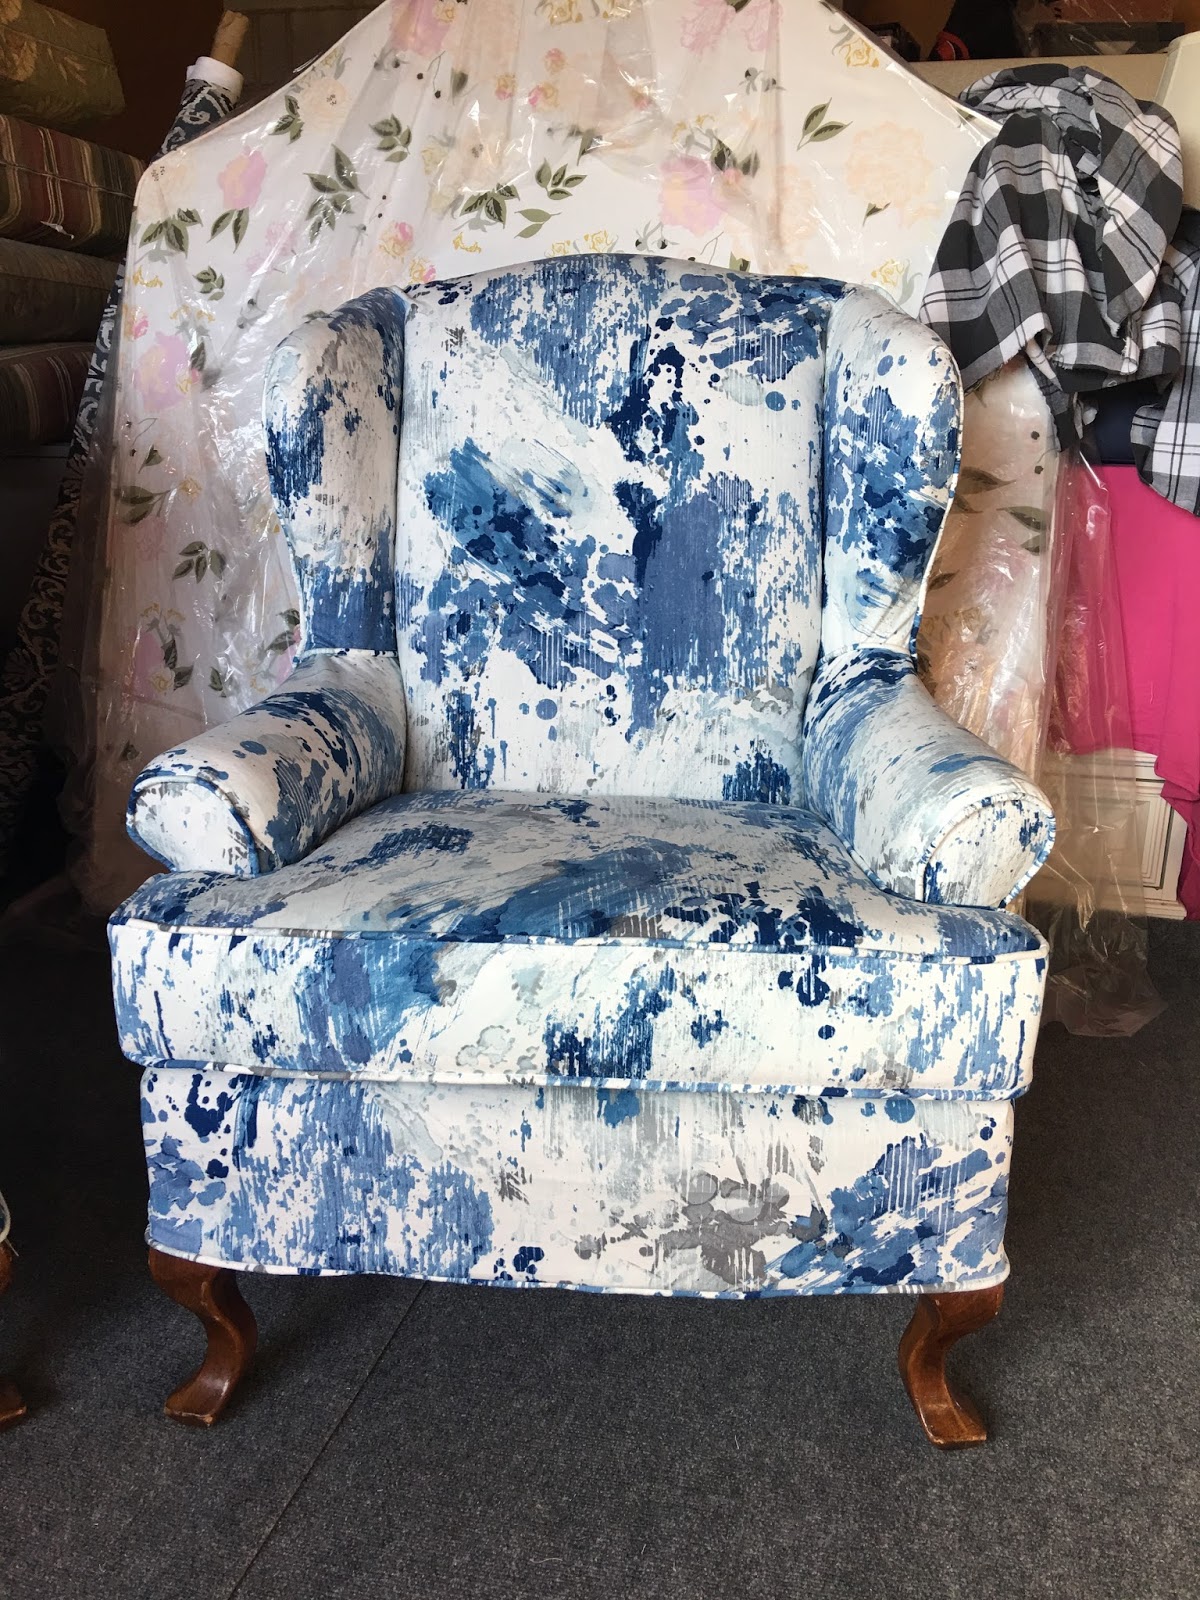
My next client was another repeat client and when she contacted me she already had her fabric, which is awesome. The only problem was she only had 9 yards for 2 wing chairs.. no bueno!! Luckily she picked up a white denim to fill in where i needed to. Here is the before of the chairs.
She HATED the seat cushions, and I don't blame her! They hung over the sides and front of the chair by 2"! That is a lot! So I had new cushions made for them that fit like a glove. Now.. for the tricky part... I had 9 yards of this amazing blue fabric to work with, NINE!! You normally need 9 yards PER wing chair, so right away I new I had to be careful when I cut the fabric and I had to be creative as well. We decided right away that the decking and back side of the chair would be out of the white fabric. she was also ok with one side of the seat cushion to be in the white as well as the piping... and skirts were out of the question!


Well my friends, I was able to get the most out of this fabric and it was a freaking miracle too! The only place I ended up using the white was the backs of the chairs, the decking and the zipper boxing! I worked like a wizard! I was able to get BOTH sides of the seats cushions as well as the piping out of the blue fabric and when my darling client saw them she was amazed!! I seriously LOVE this fabric and she could not have been happier with how they turned out!
One of my most favorite Design clients contact me needing some stuff done for her daughters room, which also was for a photoshoot of her nest line of fabrics! And she nailed the design! She brought me a headboard and chair to slipcover as well as needed a bench cushion for a little nook in the room.. I mean Seriously!!!! The good news is you can purchase her fabrics
here! You will not be disappointed!
I was contacted thru instagram for this next project. My cute client lives in Georgia and was in desperate need of an updated for her Ikea Erkorp chair... I told her if she sends me the cover I could do it, and so that she did! She wanted a neutral buffalo check this time around so she used
this!
She was soo happy with it, I was just happy it fit period! lol!
On to some great news, my good friend Kat finally opened her new fabric store in Draper! Its called The Fabric Store and has a great selection of fabric at really great prices!! She just gets it.. The address is 12300 S 196 W Draper. I actually slipcovered a chair for her store out of some of her fabric...
this was the before:
The chair as you can see is in impeccable shape but needed a youthful update so we pulled out a nice blue grey tones to liven it up a bit. I love this print and yes, she does have more!!
The print is classic, yet modern! and I love the tones of the blues in it, but then again.. I am a sucker for blue!
I just finished up a pair of these settees for another cute client that again, had just enough fabric to get the job done..
She chose a lovely stripe for the backs and then a neutral solid linen for the seat. I added a skirt but kept it short so the legs would still show thru.. plus we only had soo much fabric to work with. She has 8 dining chairs that match the set... Cant wait to see what fabric combination she comes up for those!
So that sums up my recent work load and I am in the middle of getting thru the rest of my schedule before Christmas.. yikes! I may have 1 or 2 openings but that is if you are ready to rock and roll! After Christmas I am taking a much needed break and then will be back to work in February. So if you have stuff you want done, contact me to get on my list for February.
As for our house progress...we, meaning me.. have started with the basement. We need to get it done before we can start on the major renovation upstairs, which I will NOT be doing..lol! Here is a little progress shot of the basement..


We scrapped the popcorn ceilings (who ever invented that technique should die..) I had my plumber add some stuff to the basement kitchen, since it will become the laundry room/ basement kitchen with a fridge and range. Its a great size room and lets in a lot of light. I also had the electrician come and move some electrical, add a few (lot) of can lights, you can never had too much light! Plus the 60's boob lights had to go! During the process we opened up an entry way to the "secret" bedroom on the other side of the family room so you don't have to walk thru the utility and storage room to get there. This will be the kids play room! I have learned with our last 4 houses that designated playrooms are a MUST! We are waiting for the new windows to be installed next week, once those babies are in things will really start coming together! Paint, trim, doors, floors cabinets and tile. We decided that in the family rom and hall to refinish the concrete floors... its a basement and we have flood irrigation.. you do the math. I friggin LOVE how they turned out! All they did was grind the concrete (i think he said they did 4 passes) and then sealed it. I love how the aggregate shows thru plus it keeps some of the character from the house. The paneling.. yes, it is staying! In fact we replaced some of it with new stuff... lol! we sanded and paint paneling in our last house and loves it and where its pretty much everywhere in the basement we are embracing it and doing it again.. plus the door under the stars is integrated in with the paneling.. you just don't mess that brilliance up!
So there! You are all caught up! I still can't breathe and I have the scariest cough known to man, but I promise promise that Ill stay caught up on slipcovers and the house! It has been fun playing with the floor plan and I am stoked about what this house will become!


 Ok... so today I want to show you our basement transformation!!! Our contractor was able to finish it up while we were gone and boy oh boy I am friggin ecstatic about it! So to fill you in.. last June we bought a 1960's brick ranch rambler on 3.5 acres of property! Did I mention it had NEVER been remodeled.. ya.. we knew the house had mad potential but let's be honest.. we bought it for the land, the house could be redone. We started with the basement. Here she is in all her original glory! There is a kitchen, full bath, family room, 2 bedrooms and a storage/mechanical room. But, to access one of the bedrooms you had to go thru the scary dungeon😬. Like Home Alone scary!


 When we took these pics we had already ripped up the orange shag carpet because it was nasty!!! The paneling was everywhere and the fireplace wall.. it is AMAZING!!! I knew that we could paint the paneling, we did it in the last house and it looked great, soo, why not do it again? Plus there is a super cool door under the stairs that is integrated into the paneling. They were not messing around when they built this house folks!


 Instead of doing carpet down here I went a different route and refinished the concrete floor. The previous owners had a flood back in the 80's when the irrigation water made it to the house, so we figured this would be easier to deal with in case it floods again and I am so glad we did!! All I had them do was grind the concrete down and seal it. The natural color and aggregate of the cement was really pretty and just what I wanted! Plus it's pretty low maintenance and I have a great rug I can throw down to warm it up. I had all the walls, ceiling and trim painted in "Simply White" by BM, the accent walls are "Agreeable Gray" by SW and the doors are "Carbonized" by SW. I love how bright it is down here and I love the black doors even more!
 I love the imperfections of the ceiling because it adds character to the house. I went with a neutral color patterned carpet in these two rooms to warm them up a bit, I used this carpet in the last house only it was grey.. and it was too grey😬. But I love this combo🙌🏼 and the carpet is soo soft and super durable.
  Here is the "toy room" where we opened up the wall. Before there was a vanity with lights between the two closets. When the previous owners were building the house they used this as their master! The can lights in the ceiling are original and rad! So they had to stay. I kept the original doors in this room because they fit like a glove and let's be honest, it's the kids toy room.. I love designated toy rooms because it keeps the kids toys in one place, and you can let them destroy it. All you have to do is shut the door😘.

 I really love this bathroom! Ok... on to my favorite room in the basement, the laundry/kitchen.

 I friggin LOVE this room! Everything about it! I have always wanted to try this pattern on the floor and I want to marry it! It's amazeballs! And yes, it's vinyl! All the cabinet hardware came off the original cabinetry from this very room! Who knew it would come back in style! I added a few pendant lights above the sink, the ceiling lights and wall sconce are original to the house... although they may not make the final cut... I haven't decided if I like them yet😬 the wall sconce looks pink in person 😩 let's talk about this brick, shall we? I originally was going to just get a red brick and paint it white but when I went to pick it out I stumbled upon this glorious sight! It's a white and grey washed brick! It was only about $100 different in price and it had all the tones I was after.. so that was a no brained for me! I carried in the same grey quartz that is in the bathroom but did white cabinets in here to keep it bright. I love having a countertop over my washer and dryer, it makes laundry day soo much more enjoyable! (Although I still need a filler piece to fill in above the washer and dryer..).
  Right outside this room is the landing to the stairs with some built-ins.. I just had the doors painted black to tie them in with everything else...
 And once again, I used the original hardware on the doors. I love the all the character and imperfections that pulled thru along with all the new! I can't wait to tackle the upstairs! Which is looking to be a lot sooner than I expected😬.